Lead flashing repair starts with deciding what has actually failed
Lead flashing repair is not always a matter of adding fresh sealant over a visible gap. The first question is whether the lead itself has failed, whether the mortar chase has opened, whether water is entering through the wall above, or whether the roof covering below the flashing is the real weak point.
A small loose section of lead may be repaired locally. A cracked, badly fixed or repeatedly patched detail may need replacement. If the roof membrane, tiles, chimney, parapet wall or flat roof upstand has also deteriorated, the repair has to deal with the whole junction rather than only the visible strip of lead.
When lead flashing can usually be repaired
Repair is normally most realistic when the lead is still in reasonable condition and the defect is local. In practical roofing work, this usually means the material has not split badly, the surrounding roof is sound, and the wall or chimney detail can still hold a proper fixing and seal.
Lead flashing repair may be suitable where there is:
- A small open chase: the lead is still usable, but the mortar or seal above it has failed.
- Loose lead at one short section: the flashing can be reset and secured without rebuilding the full detail.
- Failed surface sealant: old mastic has shrunk or pulled away, but the lead underneath is not cracked.
- Minor mortar damage: local repointing can restore the protection above the lead.
- One isolated leak point: the rest of the flashing and roof junction remain stable.
These repairs still need proper preparation. Old sealant, loose mortar and dirt should be removed before any new seal is applied. If the repair is placed over unstable material, it may look finished but fail again after the next period of movement or heavy rain.
When lead flashing replacement is more sensible
Replacement becomes more sensible when the lead has reached the point where local repair cannot restore the detail properly. This is common where the lead is split, too short, badly chased, over-stretched, incorrectly lapped or covered in several layers of old patching.
Replacement is usually the better option where there is:
- Cracked or fatigued lead: especially where the split has formed because the lead cannot move correctly.
- Poor original installation: shallow chasing, short cover, wrong lap or badly dressed corners.
- Repeated failed repairs: several layers of silicone, tape, cement or coating often hide the real defect.
- Lead pulling out along a long section: this often means the chase, fixing or mortar condition is not reliable.
- Water entering behind the roof covering: the visible flashing may be only one part of a wider failed junction.
There is little value in preserving old lead if the detail was wrong from the beginning. In those situations, removing the failed section and rebuilding the flashing properly is often more reliable than adding another temporary repair.
The difference between sealing and repairing
Sealing is only one part of some lead flashing repairs. It may be enough where the lead is sound and the joint above it has opened slightly. It is not enough where the lead has cracked, where the chase is too shallow, or where water is entering from behind the roof covering.
Surface sealant can fail because lead, brickwork and roof coverings move differently. Lead expands and contracts with temperature changes. Masonry absorbs moisture and dries out. Timber roof decks and felt systems also move slightly. If the original detail does not allow for that movement, a bead of sealant is usually only a short-term cover.
A proper repair should restore the weathering principle of the detail. Water should be directed over the flashing and back onto the roof surface, not simply blocked by a line of mastic.
Common places where lead flashing needs repair
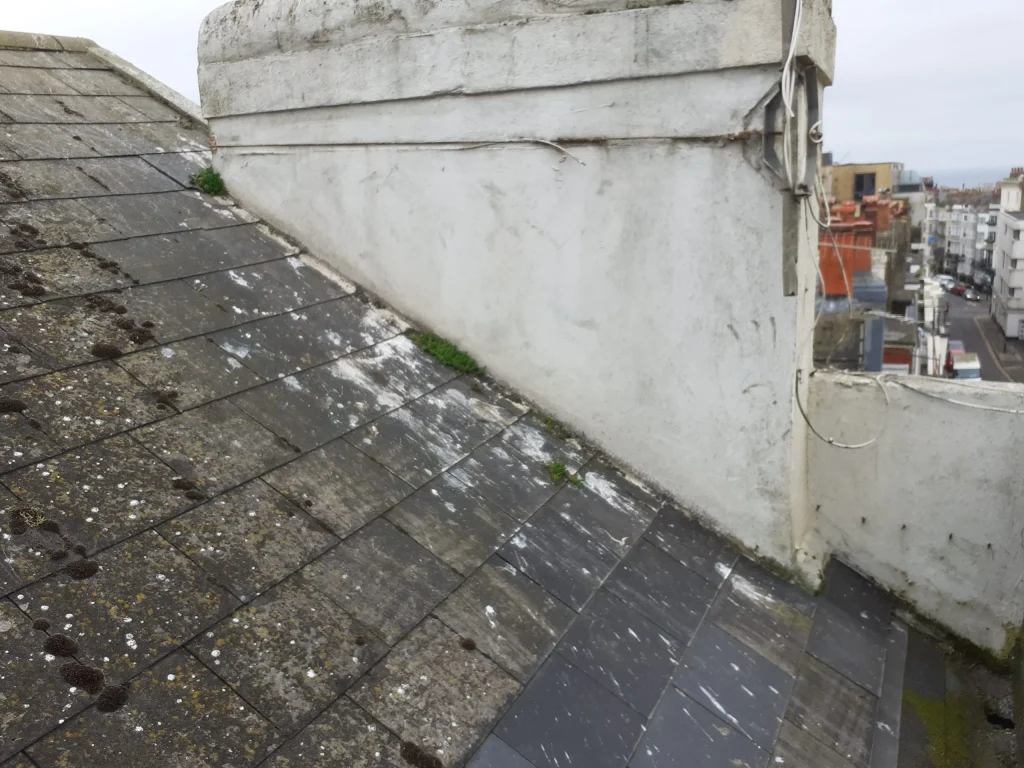
Chimney flashing
Chimneys are a common source of lead flashing repair work because they have several separate weathering points. A chimney may need apron flashing at the front, stepped flashing or soakers at the sides, and a back gutter behind the stack. A leak may come from any of these areas, or from cracked pointing and porous brickwork above the lead.
Wall abutments
Where a roof meets a wall, the flashing normally protects the roof-to-wall junction. If the chase opens, mortar fails or the lead does not cover the upstand properly, wind-driven rain can track behind the roof covering. On older Sussex properties, the brickwork above the flashing should also be checked because damp can enter through the wall rather than the lead itself.
Flat roof upstands
On flat roofs, lead flashing often protects the top edge of a felt or membrane upstand. If the SBS torch-on felt, deck or wall upstand has failed below the lead, repairing only the flashing may not stop the leak. The lead and the flat roof waterproofing need to work as one detail.
Bay windows and porches
Small roofs above bay windows and porches often leak at the wall line. The roof area may be small, but the flashing detail is exposed and visible. A neat finish matters, but the key issue is whether the lead is properly chased, sealed and dressed over the waterproofing below.
How a lead flashing repair is normally assessed
A sensible inspection follows the likely path of water. The visible damp mark inside the property may not sit directly below the entry point, especially around chimneys, parapet walls and flat roof junctions.
A proper assessment normally checks:
- whether the lead is cracked, distorted, loose or pulling out;
- whether the chase is deep enough and the mortar is still sound;
- whether old sealant or cement is hiding the real condition;
- whether water can pass behind the flashing by capillary action;
- whether the roof covering below the flashing is still watertight;
- whether nearby brickwork, pointing, render or coping stones are allowing moisture in;
- whether the internal damp pattern matches rainwater entry or possible condensation.
This diagnosis is important because a flashing repair can only work if it deals with the true entry point. If water is coming through cracked brickwork above the lead, replacing the visible flashing alone may not solve the damp problem.
Temporary repair versus long-term repair
A temporary repair can be useful where water needs to be reduced quickly and a full repair cannot be completed immediately. This might involve weatherproofing a small open joint or making a short-term seal until safer access or better weather is available.
A long-term repair is different. It should remove failed material, restore the chase or fixing, allow the lead to move correctly, and make sure the roof covering below the flashing is protected. If the work only covers the symptom, the leak can return because the original cause has not changed.
For homeowners comparing likely options, a lead flashing repair cost calculator can help show how chase cutting, Code 4 lead, sealing, patination oil and replacement sections affect the likely scope of work.
Cost factors in lead flashing repair
Lead flashing repair cost depends less on the size of the visible defect and more on access, detail complexity and what has failed around it. A small chimney repair on a steep roof may be more involved than a longer low-level wall flashing repair.
The main factors include:
- Access: high chimneys, steep pitched roofs and awkward rear elevations take more time to work on safely.
- Length of affected flashing: a short local repair is different from resetting or replacing a long wall abutment.
- Condition of the mortar chase: loose or crumbling joints may need cutting out and rebuilding before sealing.
- Lead condition: sound lead may be repaired, while cracked or fatigued lead may need replacement.
- Roof type: flat roofs, tiled roofs, chimneys, dormers and bay windows all need different detailing.
- Surrounding defects: broken tiles, failed felt upstands, porous brickwork or rotten decking can increase the work required.
- Old patch removal: layers of cement, silicone, tape or coating can slow the job because they must be cleared before a proper repair is possible.
Exact pricing should be based on the actual detail, not only on the word repair. Two jobs can both be described as lead flashing repair while needing very different labour, access and materials.
Warning signs that the repair should not be delayed too long
Lead flashing faults do not always cause heavy dripping straight away. Sometimes the first sign is a stain near a ceiling edge, damp around a chimney breast, peeling paint near a bay window, or water marks after wind-driven rain.
It is sensible to arrange a closer look if you notice:
- recurring damp in the same area after rainfall;
- visible gaps above lead flashing;
- lead lifting away from brickwork;
- cracks through the lead surface;
- loose mortar around a chimney or wall chase;
- old sealant repairs opening again;
- water marks close to a flat roof wall junction.
These signs do not automatically mean the whole roof needs replacing. They do mean the junction should be checked before moisture has time to affect timber, insulation, plaster or the roof deck below.
When inspection is better than guessing from photos
Photos are useful for showing obvious cracks or loose lead, but they rarely show chase depth, hidden movement, trapped moisture, soft decking or the full route water is taking. This is why some flashing repairs fail even though the visible gap was covered.
If the leak source is uncertain, a roof inspection for lead flashing leaks can help separate failed leadwork from cracked masonry, chimney defects, poor flat roof upstands, blocked gutters or condensation inside the property.
Practical conclusion
Lead flashing repair is worthwhile when the lead is mostly sound and the defect is local. Re-sealing, re-pointing, resetting or replacing a short section can solve many flashing problems if the surrounding roof detail is still in good condition.
Replacement is more sensible when the lead is cracked, badly fitted, too short, repeatedly patched or no longer able to move correctly. The most reliable repair is the one that deals with the whole junction: the lead, the wall, the roof covering below it and the way water is being directed away from the building.