1. What roof flashing is and why it often leaks
Roof flashing is the protective detail that keeps water out where the main roof covering changes direction, meets a wall, or forms an edge. Instead of relying on tiles or slates alone, flashing creates a controlled overlap that directs rain safely back onto the roof surface or into a gutter.
On a typical property this includes chimneys, roof-to-wall junctions, valleys, dormers, bay windows, flat roof edges and parapet walls. These are the points where most flashing leaks and roof leak flashing problems start, because different materials meet and move in different ways.
Most tiles, slates and modern membranes are very good at shedding water across open areas. Leaks usually appear where that open surface stops and meets something else – brickwork, a chimney stack, a dormer cheek, a parapet, or another roof slope. Here, the waterproofing depends on the way the flashing on roof has been designed and fitted.
When that detail is loose, too short, badly lapped, split, or buried under old sealants, water can bypass the junction and appear inside the property as stains or damp patches. From inside, a roof leak flashing issue can look much the same as any other roof problem, but the repair approach is different: diagnosing and repairing roof flashing means understanding the whole junction, not just the most obvious gap.
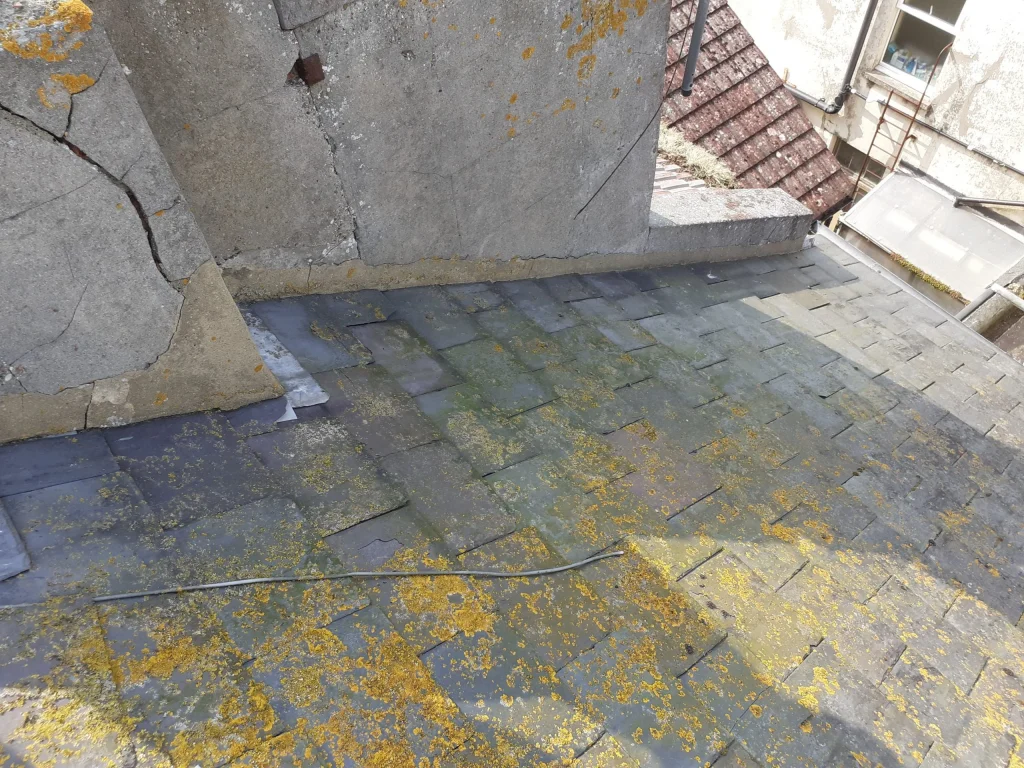
2. Typical places where roof flashing repairs are needed
Flashing problems rarely appear in the middle of a clear roof slope. They almost always occur where the roof covering stops and meets something else. These junctions are where most roof flashing repair, fixing roof flashing and repair flashing roof work is needed, because multiple materials meet, move and weather at different rates.
Understanding which detail you are looking at – chimney, wall, dormer, valley or flat roof flashing – is the first step in choosing the right roof flashing solutions and avoiding repeat leaks.
2.1 Chimney flashing
Chimneys are one of the most common sources of flashing leaks, because they interrupt the roof slope and introduce several separate water entry points in a very small area. A typical chimney junction can include:
- front apron flashing at the lower side of the stack,
- side soakers or stepped flashing running up each side,
- rear flashing or a back gutter at the high side,
- flaunching around the chimney pots at the top,
- brickwork and mortar joints that can become porous over time.
From inside the property, all of these issues can look the same – damp staining around the chimney breast, ceilings close to the stack, or upper wall corners. From outside, the only visible part may be the front strip of lead, so it is easy to assume that sealing this one piece will fix roof flashing and cure the leak.
In reality, a proper roofing flashing repair at a chimney should consider the whole junction:
- Front apron flashing: checking that the lead is long enough, correctly dressed over the tiles or slates, and properly built into the brickwork chase.
- Side flashings and soakers: confirming that each course has adequate overlap and that no pieces are missing, slipped or cut too short.
- Back gutter and rear flashing: ensuring there is a clear fall, enough depth to carry water during heavy rain, and no debris blocking the channel.
- Chimney masonry and flaunching: assessing whether water is actually tracking through saturated brickwork or cracked flaunching and then behind otherwise sound flashing.
A leak that appears to be “from the flashing” may in fact be caused by crumbling mortar joints above, or by split lead in the back gutter where thermal movement has created cracks. In these cases, simple sealant along the visible edge will not provide a lasting roof flashing solution.
2.2 Wall abutment flashing (roof-to-wall junctions)
A wall abutment is where a roof slope meets a vertical wall. This is common on side extensions, rear additions, gable walls, dormer cheeks and parapets. Here, the flashing has to catch water running down the wall and divert it safely over the tiles, slates or flat roof beneath.
Typical problems that lead to flashing on roof leaking at a wall abutment include:
- Shallow or poorly cut chase: the groove in the brickwork is barely deep enough to hold the flashing, so wind and thermal movement make it work loose.
- Loose or cracked mortar: dried-out pointing fails, leaving gaps where water can track behind the flashing.
- Insufficient overlap: the metal does not extend far enough over the roof covering, allowing capillary action to draw water up underneath.
- Low upstand height: the vertical part of the flashing is too short, so driven rain or ponding water can overtop the detail.
- Porous masonry above the flashing: especially on older Sussex properties, rain can soak into aged bricks and mortar, move down behind the flashing, and show up indoors as a leaking roof flashing problem.
For repairing roof flashing at a wall abutment, a good roofer will not just run a bead of mastic along the top edge. They will check how deep and secure the chase is, whether the wall itself needs repointing, and whether the flashing is adequately lapped and correctly stepped or straight, depending on the construction.
2.3 Dormer and bay window junctions
Dormers and bay windows concentrate several vulnerable details in a tight space. A single small structure can include:
- front apron flashing where the dormer or bay roof meets the main wall,
- side flashings or soakers along the cheeks,
- small valleys where roof slopes meet,
- a flat or low-pitched roof surface, often in felt or another membrane,
- render edges, drip trims and window head details.
Because these roofs are often above living spaces like lounges and bedrooms, even a minor defect can quickly become visible as staining on ceilings or upper internal walls. From the inside, this simply appears as a roof leaks flashing issue; from the outside, it may be a combination of problems.
Typical faults at dormers and bays include:
- Loose or badly sealed flashing where the dormer cheek meets the main roof.
- Cracked felt or membrane upstands behind the visible metal flashing.
- Insufficient fall on the small flat roof area, causing water to sit against the junction.
- Previous patch repairs – layers of mastic, tape and cement hiding split lead or failing membrane below.
In some cases, repairing flashing here can be local – re-fixing a short length of lead, re-pointing a chase or replacing a damaged piece. In other situations, especially where the flat roof deck has softened or the waterproofing has reached the end of its life, a more thorough rebuild of the roof-to-wall junction is the only reliable roof flashing solution.
2.4 Flat roof edges and upstands
On flat roofs, the visible metal flashing is only part of the waterproofing. The primary defence is the upstand – the way the felt or membrane turns up the wall or upstand before the metal covers the top edge. If this underlying detail fails, no amount of sealant to the surface flashing will permanently repair flat roof flashing.
Common issues that lead to flashing on roof leaking on flat roofs include:
- Cracked or slumped upstands: the felt or membrane has split where it bends at the base of the wall, allowing water to get behind.
- Upstands that are too low: ponding water or driven rain can overtop the junction, especially where roof falls are poor.
- Loose cover flashing: the metal that should protect the top of the upstand has pulled away from the wall, leaving the membrane exposed.
- Poor junction with parapet or adjoining pitched roof: details where flat and pitched roofs meet are particularly sensitive to bad detailing and blocked drainage.
Effective repair flat roof flashing almost always means checking the condition of the membrane behind or below the metal. If the felt upstand is cracked or not properly bonded, the repair may need to include cutting back and renewing part of the flat roof system, not just re-sealing the visible flashing.
2.5 Valleys and drainage details
Valleys and similar drainage details are different from simple wall flashings because they do more than shed water – they collect water from two roof slopes and concentrate the flow. This means that any weakness, obstruction or design flaw will show up quickly as a roof leak flashing problem, even when the surrounding tiles or slates still look fine.
Typical valley issues that require roof flashing repair include:
- Narrow or poorly formed valley gutters: the channel cannot handle heavy rainfall, so water backs up and spills sideways beneath the tiles.
- Debris build-up: moss, leaves and broken tile fragments slow the flow of water and create mini-dams that push water under the edges of the roof covering.
- Incorrect tile cuts: tiles cut too close to the valley centreline can direct water behind the liner, while very wide gaps can expose too much of the flashing to the weather.
- Cracked or corroded valley liner: metal or mortar-lined valleys can split, allowing water to track below.
Because valleys are a critical drainage route, fixing roof flashing here is as much about restoring a clear, correctly shaped water pathway as it is about the material itself. Simply patching a small split without addressing blockages or poor tile cutting often leads to further flashing leaks the next time there is heavy, wind-driven rain.
3. How to diagnose and repair leaking roof flashing
Many homeowners search for how to repair flashing on roof or how to fix roof flashing expecting a quick sealant-based solution. In practice, durable roof flashing repair depends on diagnosing the real water path and then choosing the right level of repair – from simple re-sealing to full junction rebuilding.
3.1 Why the visible gap is not always the real problem
It is common to see a damp patch on a ceiling, look outside, and notice a small gap where the flashing meets the brickwork. The obvious reaction is to buy a tube of mastic and try fixing roof flashing by filling the crack. Sometimes this works as a short-term patch, but often the real defect is elsewhere along the water path.
Water rarely takes the most visible route. A proper assessment of any roof leak flashing or flashing leaks issue needs to consider:
- Porous brickwork above the flashing: older Sussex brick and mortar can absorb rain, letting water travel down inside the wall and emerge behind otherwise sound flashing.
- Capillary action at the lower edge: if the flashing does not extend far enough over tiles or slates, water can creep upwards underneath and into the roof.
- Failed upstands on flat roofs: if the felt or membrane behind the visible metal has split, the cover flashing can no longer protect the junction, no matter how much sealant is added.
- Cracked underlay or valley liners above the detail: water may already be inside the roof structure before it even reaches the flashing.
Because of this, simply treating the most obvious surface crack as the whole problem often leads to repeat roof leaks flashing and growing internal damage.
3.2 How a roofer should inspect flashing before deciding on a repair
A reliable inspection for repair flashing roof work should follow the path of the water, not just the line of the metal. A good roofer will:
- Check the roof area above the flashing – for broken tiles, slipped slates, blocked valleys or damaged flat roof membranes.
- Inspect the flashing material – looking for splits, buckling from thermal movement, inadequate overlaps and poor dressing over the roof covering.
- Examine the chase and fixings – confirming that the groove in the wall is deep enough and that mortar or sealant is sound.
- Assess the wall or chimney condition – identifying porous bricks, crumbling mortar joints or cracked flaunching that may be letting water bypass the detail.
- Follow internal staining patterns – inside the loft or room, the position and timing of damp marks after rain help trace the leak back to its source.
Where the cause is not immediately clear, it is often worth arranging a flashing leak assessment visit so that roofing flashing repair work is based on evidence, not guesswork.
3.3 When a small repair is enough
For many homeowners searching for repairing flashing, repair flashing or how to repair flashing on roof, the good news is that some issues are straightforward maintenance jobs when caught early.
A minor repair is usually appropriate when:
- The flashing material (often Code 4 lead) is thick enough, not split and properly lapped over the roof covering.
- The chase is correctly cut and the lead is still mechanically secured in the wall.
- The surrounding tiles, slates or flat roof membrane are in good condition.
- The wall or chimney masonry is generally sound and not heavily saturated.
In these cases, sensible roof repair flashing work might include:
- Cleaning out loose or failed mortar from the chase and applying fresh pointing or specialist lead sealant.
- Re-wedging and re-fixing any sections of loose flashing so they cannot lift in the wind.
- Replacing a short damaged section of metal while leaving the rest intact.
- Improving local drainage – clearing moss and debris from valleys, gullies and gutters so water cannot back up against the junction.
- On flat roofs, locally renewing a short length of cracked upstand and its cover flashing, where the rest of the membrane remains sound.
These smaller interventions can often provide a long-lasting roof flashing solution when the underlying detail is fundamentally well designed and installed.
3.4 When the flashing junction needs full replacement
Other situations call for more than a quick sealant bead. If you are repeatedly searching for how to fix flashing on roof because the same area leaks again and again, it is usually a sign that the junction has reached the end of its life or was never properly detailed in the first place.
Full replacement is usually required when:
- The lead has split or cracked in several places: often due to overly long pieces that have buckled with thermal expansion and contraction.
- The chase is too shallow or poorly shaped: the flashing continually works loose because there is not enough mechanical grip in the wall.
- The flashing is too short or badly lapped: water easily gets behind or under the metal in heavy or wind-driven rain.
- There are thick layers of old cement, tar or silicone: repeated patching has buried the original detail, which has usually failed completely underneath.
- The roof covering or membrane below has failed: flat roof upstands, valley boards or underlay have deteriorated, so a visible flashing-only repair cannot solve the leak.
In these scenarios, a durable roof flashing repair often means:
- Stripping back surrounding tiles, slates or felt to expose the full junction.
- Cutting a new, correctly sized and positioned chase into the wall or chimney.
- Installing new lead or other approved flashing material with the right lengths, laps and fixings to allow movement without splitting.
- Rebuilding failed upstands, valley liners or supporting boards as needed.
- Reinstating the roof covering to complete the weathering system.
Although this approach costs more than brushing on another layer of sealant, it is usually the only way to stop persistent leaking roof flashing problems and protect the structure long term.
3.5 How wall and chimney condition affect the success of any repair
No matter how carefully you repair flashing, the result will be unreliable if the wall or chimney it is built into is failing. This is especially important on ageing chimney stacks and exposed parapet or gable walls common in Brighton, Hove, Worthing and across Sussex.
Key points to consider before deciding how to fix roof flashing include:
- Mortar joints: if they are crumbling or missing, rain can penetrate the wall above the flashing and appear inside as if the flashing itself is leaking.
- Brick saturation: heavily weathered bricks can absorb water that later migrates down behind the flashing detail.
- Chimney flaunching and pots: cracked flaunching can let water run directly into the stack and down behind otherwise sound flashing.
- Render condition: hollow or cracked render can direct water into the wall rather than shedding it.
In many cases, successful roofing flashing repair must be combined with repointing, masonry repairs or render work so that the whole junction – not just the metal – is watertight.
3.6 What affects the cost of roof flashing repairs
Homeowners often want to know the likely cost before committing to any repair flashing roof work. Several practical factors have more impact on price than the size of the visible gap:
- Location and type of detail: chimney flashings, long wall abutments, valleys, dormers, bay roofs and flat roof flashing each require different techniques and materials.
- Height and access: a low porch repair might be safely reached from a ladder, while a steep rear chimney may require scaffolding or specialist access equipment.
- Extent of damage: local re-pointing and re-wedging is faster than cutting a new chase and installing several metres of new flashing.
- Condition of surrounding roof: lifting and refitting tiles, slates or flat roof membranes adds labour time.
- Hidden issues: rotten valley boards, decayed battens or saturated insulation often only become visible once work starts.
- Previous patch repairs: removing thick layers of tar, cement, coatings and silicone is time-consuming but essential for a lasting repair.
To get a realistic starting point for budgeting roof flashing solutions, it is useful to use an online estimator such as the leadwork pricing calculator. This helps illustrate why two seemingly similar leaks can require very different scopes of work and cost.
4. Practical next steps if your flashing is leaking
Whether you are dealing with a one-off damp patch or long-term flashing leaks, there are some sensible steps to take before committing to any specific roof flashing repair method.
4.1 What you can safely check yourself
Without climbing on the roof, you can often gather useful information:
- Note exactly where damp is appearing inside – near a chimney breast, dormer, bay window, top corner of a room, or under a flat roof junction.
- Observe when it appears – only after wind-driven rain, or also in cold, dry weather (which can point towards condensation rather than roof leak flashing).
- From the ground or upper windows, look for obvious issues – flashing visibly lifted from the wall, cracked mortar lines, heavy moss in valleys, or sagging gutters.
These observations help a roofer focus their inspection and avoid unnecessary work.
4.2 When to call a roofer – and what to ask
If you suspect leaking roof flashing, a professional inspection is usually worthwhile. When speaking to a contractor, it is sensible to ask:
- How they will diagnose the leak – will they inspect the roof above, the flashing itself and the wall or chimney condition?
- Whether they are proposing a temporary patch or a long-term repair – and why.
- How their solution deals with the underlying cause, not just the visible gap.
A local roofer reliability guide can help you choose someone who focuses on proper diagnosis rather than quick, cosmetic fixes.
5. Summary: key points about repairing roof flashing
For anyone searching for how to repair roof flashing, how to fix roof flashing or general roof flashing solutions, the most important lessons are:
- Flashing is a system, not just a sealant line: it relies on correct overlaps, upstands, chases and drainage paths to keep water out.
- The most visible gap is not always the true leak point: porous brickwork, failed upstands and damaged valleys can all mimic a simple flashing fault.
- Good diagnosis saves money: understanding the full water path prevents repeated spending on temporary mastic and coatings that do not address the cause.
- Match the repair to the defect: minor repairing roof flashing (re-pointing, re-fixing, small section replacement) is ideal where the detail is otherwise sound; full junction rebuilding is better where materials are split, poorly designed or heavily patched.
- Consider the surrounding structure: successful roof repair flashing depends on the condition of the wall, chimney, roof covering and drainage as much as on the metal itself.
Handled in this way, a properly designed and installed flashing detail around chimneys, walls, dormers, flat roofs and valleys will provide long-term protection and greatly reduce the risk of future flashing on roof leaking problems.