What roofing lead flashing means
Roofing lead flashing is a waterproofing detail used where a roof covering meets another surface, such as a brick wall, chimney, dormer cheek, parapet wall, bay window roof or roof abutment. Its job is not to cover the whole roof, but to protect the vulnerable joint where rainwater would otherwise track behind the main roof covering.
Lead is used because it is durable, workable and able to form neatly into roof shapes when installed correctly. On UK roofs, lead flashing is common around chimneys, walls, flat roof upstands, pitched roof abutments and small roofs over bays or porches. The important point for a homeowner is that lead flashing is a detail, not just a strip of metal. It needs the right chase, lap, fixing, seal and support to keep water out long term.
Why lead flashing matters on a roof
Most roof coverings are designed to shed water across an open surface. Problems often start where that surface ends. A tiled roof may be sound, or a flat roof membrane may still be in reasonable condition, but water can still enter if the roof-to-wall junction is weak.
This is why roofing lead flashing is so important. It protects the transition between materials that move differently. Roof decks, tiles, felt systems, brickwork and mortar joints all expand, contract and weather at different rates. Without a properly formed flashing detail, wind-driven rain can get behind the covering, soak into brickwork, or run into the structure below.
Where roofing lead flashing is normally used
Lead flashing is most often used in locations where the roof meets a vertical or raised detail. Common examples include:
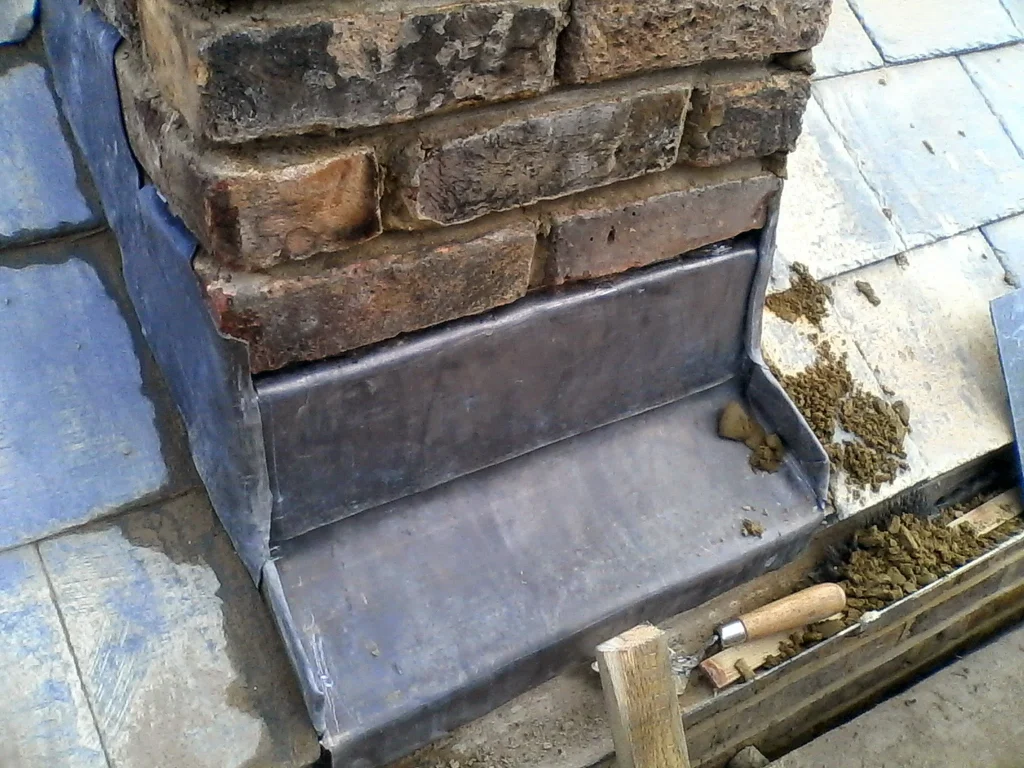
- Chimney flashing: lead is dressed around the base of the chimney to stop water entering at the junction with the tiles or roof covering.
- Wall abutments: where a pitched or flat roof meets a brick wall, lead is cut into the mortar joint and dressed over the upstand.
- Flat roof edges and upstands: lead may be used above SBS torch-on felt or other waterproofing systems where the roof turns up against masonry.
- Dormer junctions: lead protects the points where dormer cheeks, roofs and main roof slopes meet.
- Bay window roofs: small flat roofs over bay windows often depend heavily on correct flashing at the wall line.
- Parapet and firewall details: lead may form part of the weathering detail where water needs to be directed away from exposed wall tops.
On older Brighton, Hove and Worthing properties, lead flashing is often found around Victorian and Edwardian chimneys, parapet walls, rear extensions and bay windows. These buildings can have awkward junctions where old brickwork meets newer roof coverings, so the flashing detail needs to be assessed carefully rather than treated as a simple cosmetic strip.
How lead flashing keeps water out
A correct lead flashing detail works by overlapping and shedding water in the same direction as rainfall. The upper edge is normally secured into a chase cut into the mortar joint or brickwork. The lower section then covers the roof upstand or tile edge so water runs over the flashing and back onto the roof surface.
The chase is important because surface sealant alone is not a reliable long-term waterproofing method. A bead of silicone may look neat at first, but it can shrink, split or pull away as the wall and lead move. Properly installed flashing is mechanically protected by the masonry chase and then sealed to reduce water entry at the joint.
Lead also needs enough lap and allowance for movement. If pieces are too long without suitable joints, the lead can fatigue and crack. If the flashing is too short, water can be blown underneath or drawn in by capillary action, where water tracks through a narrow gap rather than simply running down the surface.
Common problems with roofing lead flashing
Lead flashing can last a long time, but it still fails when the detail is poorly installed, heavily weathered or repeatedly patched. Common defects include:
- Lead pulling out of the wall: often caused by weak mortar, poor fixing or movement over time.
- Cracked lead: usually linked to age, stress, poor sizing or thermal movement.
- Failed sealant: where old mastic has split or detached from the wall.
- Loose or lifted sections: allowing wind-driven rain to enter behind the flashing.
- Poor chase depth: where the lead was not properly let into the wall.
- Incorrect overlap: allowing water to pass behind the flashing instead of being thrown clear.
- Porous brickwork above the flashing: where the leak is not the lead itself but damp entering through the wall.
This last point is often missed. A roof may appear to have a flashing leak when the real issue is cracked pointing, porous masonry or a parapet wall absorbing water above the lead. That is why inspection matters before deciding whether the flashing simply needs resealing, repairing or replacing.
How roofing lead flashing is inspected
A practical inspection looks at the whole junction, not just the visible front edge of the lead. The roofer normally checks whether the lead is securely fixed, whether the chase is sound, whether the seal is still bonded, and whether the flashing has enough cover over the roof material below.
For a flat roof, the inspection should also check the waterproofing upstand beneath the lead. If the SBS torch-on felt, felt upstand, edge trim or roof deck has failed, replacing the lead alone may not solve the leak. For a pitched roof, the tiles, soakers, chimney back gutter, mortar joints and surrounding roof slope may all need checking.
Inside the property, staining patterns can also help. Damp directly below a chimney breast may suggest chimney flashing or masonry problems. Damp near an outside wall may suggest an abutment issue. Damp that appears during cold weather rather than after rain may point toward condensation rather than a genuine flashing leak.
Repair, resealing or replacement
Not every lead flashing problem needs full replacement. A small local defect may be repairable if the lead is still in good condition and the wall detail is sound. For example, a short section may need resealing, a loose chase may need re-pointing, or a small split may need a compatible lead repair method.
Replacement becomes more sensible when the lead is badly cracked, poorly sized, incorrectly installed or repeatedly patched. If the flashing has been covered with layers of sealant, tape or cement, it may be better to remove the failed detail and install a proper new flashing rather than add another temporary surface repair.
The decision also depends on the roof below. If the flat roof membrane, timber deck or wall upstand has failed, the flashing may be only one part of a wider repair. In that case, the correct approach is to make the junction waterproof as a complete system, not just replace the visible lead.
What affects the cost of lead flashing work
The cost of roofing lead flashing depends on the length of the detail, access, height, roof type, lead code, chase cutting, sealing, waste removal and whether the surrounding roof needs additional work. A simple low-level bay window flashing is very different from chimney flashing on a high pitched roof.
Important cost factors include:
- Access: high chimneys, steep pitches and awkward rear elevations take longer and may require safer access equipment.
- Length of flashing: longer wall abutments need more lead, more fixing work and more time.
- Condition of the wall: loose mortar or damaged brickwork may need repair before the flashing can be sealed properly.
- Lead thickness: Code 4 lead is commonly used for many flashing details, but the correct specification depends on the location and exposure.
- Roof type: flat roofs, tiled roofs, dormers and chimneys all require different detailing.
- Hidden defects: rotten decking, failed felt upstands or porous parapet walls can change the scope of the job.
For homeowners comparing possible costs, a lead flashing repair cost calculator can give a useful starting point before arranging an inspection. It helps show how details such as chase cutting, sealing, Code 4 lead and patination oil affect the likely scope of work.
Why correct detailing is more important than appearance
New lead can look tidy from the ground, but the hidden detailing decides whether it works. A neat line of sealant does not prove the chase is deep enough. A visible strip of lead does not prove the roof upstand behind it is high enough. A repair that only covers the surface may still allow water to track behind the roof covering.
Good leadwork should be formed so water naturally runs away from the vulnerable joint. It should also allow for normal expansion and contraction. Lead that is trapped too tightly, installed in long unsupported lengths, or dressed without proper movement allowance can split over time.
When a roof inspection is the sensible next step
A professional inspection is useful when the leak source is uncertain, when the same area has been patched several times, or when damp appears near a chimney, parapet wall, dormer or flat roof abutment. These details can be misleading because water may enter in one place and appear somewhere else inside the property.
If the cause is not clear from the outside, a roof leak inspection in Brighton and Sussex can help separate a failed flashing detail from other causes such as porous brickwork, cracked pointing, condensation, blocked gutters or a failing flat roof upstand.
Practical takeaway
Roofing lead flashing matters because it protects the vulnerable junctions where roofs meet walls, chimneys and raised details. When it is fitted correctly, it helps direct water safely back onto the roof covering. When it is loose, cracked, poorly sealed or badly detailed, even a roof surface that looks sound can leak.
The best approach is to diagnose the whole junction before choosing a repair. Sometimes resealing or local repair is enough. Sometimes replacement is more reliable. If the surrounding roof, wall or deck has also failed, the lead flashing should be treated as part of a wider waterproofing detail rather than a separate strip of metal.